FreedomCasts
Episode #18
#18: Bridged Networking
Learn how to expose your individual antlets as devices in their own right inside your LAN.
Video Transcription:
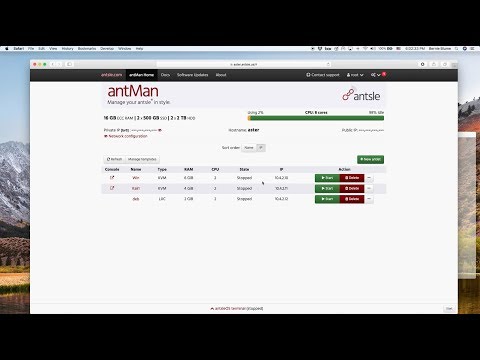
Hey, this is Bernie again, talking to you as always from sunny San Diego, bringing you our latest episode of our freedom casts. This one is about bridge networking. So what's bridge networking all about? Usually all your antlets are just reachable from within your Antsle. The Antsle has a separate sub-net where all your antlets live. So, in our case, this is the ten, four, two subnet. So that means you cannot reach your antlets from outside the Antsle. So you'd always have to go into the Antsle first and from there into the antlet. So if you want to expose your antlets to your LAN and have it seem like your antlet is just another device in your LAN, in parallel to your Antsle, not inside the Antsle, then you can use bridge networking. It’s actually cool stuff and many people love it.
So let's see how it works. We click on the antlet name to get the antlet details. Then, we click on “Virtual Network” and we can add a new virtual NIC, network interface adapter. So all we have to do is create our virtual NIC. We get a few notes on how to properly set it up. So we did just that. Now we have to configure our stuff inside the Debian antlet so that Debian knows we have a second NIC, which has bridge networking. So what we can do is just edit this file here. Um, we edited an anlets/deb/etc/network/interfaces. So just from Aster on the Antsle, we can go directly into the antlet even though the antlet is stopped. That only works with LXC antlets though.
We have those configurations here and we can just copy the eth0, which is the first NIC for ethernet0. Then, just copy it and make eth1 out of it. That way we have our second NIC here. What we can now do is start the antlets. We can SSH into 10.4.2.12. Then we can use the ifconfig command to see what's going on. So we have eth0, which is 10.4.2.12., and then we have eth1, which is 192.168.3.118. That means we have a second IP address that is not in the antsles subnet. This is in the subnet that has been provided by my router and it looks exactly like one of those IP addresses that my Antsle has. So, I can now access this Debian antlet with this IP address, 192.168.3.118. Let's just copy it. Open a new browser tab and use this new IP address.
As soon as we use this IP address, we have the debian splash screen. So, that's awesome. We have bridge networking now. So your antlet can be accessed just as if it was another device independent of your Antsle. We hope you find it as cool as we do. If you did, don't forget to hit the like button on YouTube just below this video. Share it with all your friends. Subscribe to our YouTube channel and talk to you soon. Bye.